Abstract/Realism
« Previous Entries Next Entries »Blue Flag Iris
Tuesday, July 30th, 2013

Blue Flag Iris, 24H x 18W inches graphite on paper, white mat
Flamboyant Tree flowers and seed pods
Thursday, December 6th, 2012

Flamboyant Tree Flowers and Seed Pods – Chapala, Mexico – 9H x 12W inches oil pastels on paper, white mat
At the Alamo 02
Monday, November 5th, 2012

The Alamo, San Antonio, Texas, Stone walkway on the grounds, 15H x 22W inches watercolors on 80 lb premium acid free paper, white mat.
Missing routine
Thursday, October 11th, 2012
 The Campsite, 24 x 30 inches watercolors on 140 lb cold pressed premium
I finally brought my watercolor paints back from my son’s place in Canada, where I left them so they wouldn’t freeze on the 5-day drive back west last November. Driving again, I’ve just returned from this year’s visit, when I gave my grandson a one-of-a-kind fabric book hand-made for his first birthday, Colors for Cameron. I plan to make him something special every year.
So, with a couple of new brushes and 12 x 16″ paper block, and now with the rainy season upon us back in Oregon, I look forward to establishing a routine of painting again. Invigorated by a summer full of gardening and flowers, the stunning scenery across America this time of year, plus reviewing archives of work I haven’t seen for ages, I’m all set to splash out some new watercolors. Our Portland house is a renovator’s dream/nightmare!, and we’re not out of the woods yet. Attempting to focus more on art than house, smaller paintings are more manageable and less of a production than my typically large canvas paintings…however, I’m curious to experiment and see how watercolors behave on primed canvas at some point!
Stars in the Sweetgum
Thursday, June 28th, 2012

Stars in the Sweetgum, 12H x 9W inches charcoal and colored pencils on paper, preliminary study for a larger painting of the Sweetgum tree in our side yard.
Portraying darkness is an excellent way to study color. Inspired by travels on clear nights when speeding by tree silhouettes, there’s an illusion that horizon is absent, and the stars are in the trees. I often marvel how dark skies can still be so colorful, ranging from rich teals, purples, sometimes shades of red and orange.
Chrysanthemums
Tuesday, June 26th, 2012

Chrysanthemums, 85W x 45H 3D inches graphite, charcoal, soft pastels, fixative with primer used as paint on white 100% cotton. Grey narrow frame. This is a beautiful painting, impressive because of its size and the expressionistic style of the flowers. The small photo doesn’t do it justice, so some detail images are provided below. It’s hanging in our family room on a grey wall beside the Chrysanthemums Chair. They do look great together!
| Detail images: |  |
 |
 |
||
 |
 |
 |
Adding Color: the point of no return
Wednesday, May 30th, 2012


Chrysanthemums, work in progress; see previous post. Above: color details of 85W x 45L inches graphite, colored charcoal / dry pastels on white 100% cotton
When working with a large format, it’s easy to overwork the smaller areas. They’re like little compositions on their own. The trouble is, they may seem successful close up, but may not contribute to the overall balance and flow of the larger piece. Above are some examples, where I’m now reluctant to change what needs to be changed…but I will. Back to Art 101: It’s absolutely necessary to stand back often and study the entire composition from afar.
When you throw in a factor like color, there’s no turning back. I had a specific purpose for this drawing though; to fill a wall space in an otherwise fairly monotone, contemporary room. The idea was to create a look similar to a black and white photo where one color highlights the main subject only.
It’s obvious that introducing color has compromised some of the original spontaneity, so to recapture some of that energy, I carefully try not to disturb what’s left of those livelier marks, and enhance some with little sparks of color. Isolating red, and only red to the central main flower sapped all the attention, so I’ve added more colors to it and the surrounding elements than initially planned.
Zen Garden #10 almost finished
Wednesday, November 10th, 2010

Zen Garden 10, 40 x 60 x 3 inches mixed media on canvas.
The final stages of this paintings will be finished as it hangs on a wall. As seen in a realistic room setting, it will be easier to spot whatever might make the composition more interesting. Some colors may need to be re-enhanced to add more depth and definition, but I also like the overall faded look, so we’ll see. The texture continues around all 3D edges. This painting is extremely heavy, as it is on a home-built canvas stretcher, so it will be transferred onto a lighter-weight stretcher if it sells. It will still be stable, but practical. All paintings in the Zen Garden series are wired to hang in any of 4 orientations: vertically or horizontally. Below: details of left central portion as seen in the above.

Zen Garden #09 and #10
Tuesday, November 2nd, 2010
Zen Garden 09 work in progress, 48 x 21 x 2 inches mixed media on canvas
The perfect painting in a room can elevate the atmosphere of the whole floor, and sets the tone for showing off the entire house. With selling the house in mind, I’m trying to choose a decent painting for our living room, because Zen Garden 02 sold, so I decided it’s worthwhile to make two more for the series.

Zen Garden 10 outline, 40 x 60 x 3 inches Mixed Media on canvas
Painting is always meditative, but I find it especially so when creating pieces in the Zen Garden series. This kind of work does not present the same kind of emotional concentration or intellectual challenges that other paintings do. There are few struggles and hardly any decisions to make, except to find cooperative materials. Once the outline is accomplished it’s pretty straightforward compared to other forms of painting. The outstanding difference is that each stage in these 3D paintings requires time and patience to allow areas to dry before proceeding. The Zen Gardens can be drying in stages while other work gets done too, and the multi-tasker in me is quite happy to be accomplishing many things at once!
 Art supplies are expensive. Most will last long enough to justify purchases, and much of the time you get what you pay for, but some items are ridiculously overpriced. Keeping material costs down is essential so they aren’t reflected in the final price, but quality should never be compromised. Still, there are ways to get around any dilemma, and there are alternatives for everything.
When I started the Zen Garden series ten years ago using modeling paste and textured gels, jars were about $15 for 250 ml. Since then I’ve experimented with various unusual materials, and shopped everywhere to compare prices. It’s still more economical to purchase brand-name products in larger quantities – if you can find them. There are some fun mediums available now too, like gel with tiny glass beads in it. Prices for art supplies do not seem to waver over time in either Canada or the U.S., so I reserve the brand-name mediums to sculpt the rocks and highest quality paints do the finishing touches. Here I’ll share a few of the trade secrets I’ve discovered over the years, and you can create your own Zen garden painting.
 As a base for the raked sand mixture, it’s worth purchasing a large 2 gallon (7.58 L) pail of textured paint. I purchased Behrs at Home Depot in Canada, and it looks like Ralph Loren has the market cornered in the States. Watered-down drywall plaster can be used also, but I recommend attention to how heavy the piece may be when it’s finished. Mix in copious quantities of white glue, large containers of white or light-colored acrylic craft paints, and anything water-based that will extend the liquid mixture and bind well with the dry ingredients. Sand, even popcorn kernals and/or rice can be added for texture. Other objects can be incorporated too…just use your imagination. For example, and this is my most valuable secret, unscented kitty litter from the dollar store, the non-absorbant kind, looks exactly like tiny stones and is light in weight.
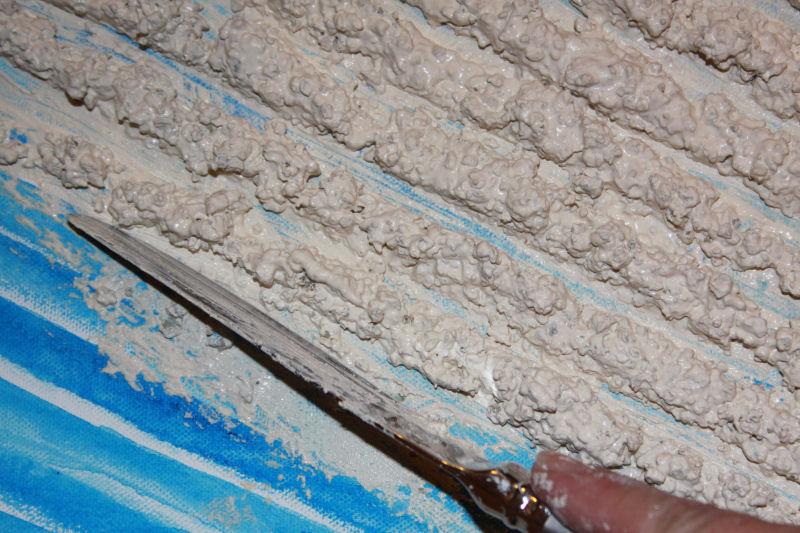
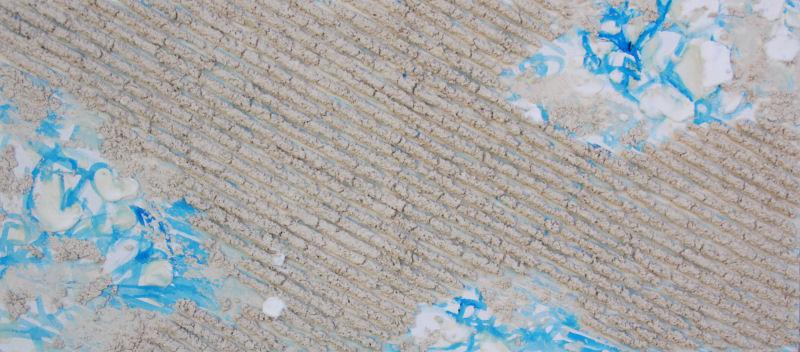
Zen Garden 09 details: applying mixture with a knife, sculpting rows
 The mixture can be put in a ziplock bag with one corner cut out, but I discovered that it’s more efficient – however messy – to spread small portions out onto the surface with a knife and hand-mold it. Keep a wet cloth handy to wipe your hands and the utensil often.
Drywall plaster makes nice-looking rocks, plus it cracks well for a parched-earth look, use sparingly because of added weight. Wood filler is a lighter alternative, much less expensive than professional brand gels and mediums. Modeling pastes do not lend well to sanding or carving when dry, but wood filler can be sanded and re-shaped.  Also, if it dries out completely, chop it up, add water then seal the container for a day or so. This is where you can experiment with whatever helps acheive 3D effects. Art, craft, hardware, department stores and dollar stores carry generic brand basics, so it’s worth researching and shopping around.
When it’s all dry, rocks and other details are outlined and painted with pure colors, then all covered with a coat of primer. The colors are all reapplied to further enhance rocks, then brushed white, skimming across the entire surface. This process is repeated until you are pleased with the results by a final coat of white with remnants of the layers of colors poking through underneath. As far as acrylic paints, you do get what you pay for, but price differences are mostly due to pigment quality and viscosity, which, until final stages is not really an issue. Inexpensive acrylic craft paints are perfect as a filler (only).
 Zen Garden #10, above and left is already quite heavy, so about 1/4 of it will be painted rocks, keeping the sand patterns to a minimum. There is enough mixture that could dry out if it’s not used right away, plus it’s great to make multiples while all the mess, materials and utensils and are out, so I’m doing two simultaneously. There may even be enough for 3!
The necessity of work, especially if it’s at home, seems less like a chore if you dangle some kind of carrot for yourself every day. Sometimes having too much to do is more exhilarating than exhausting. Each day, though work as an artist can be considered by others as play, the energy, motivation and circumstances are unpredictable.. It takes self-discipline to find a way to go with the flow and still get work done. The good thing about this occupation is that it is flexible in every way. The creative compulsion seeps into every other activity, and there is almost no way to not add a little something extra.
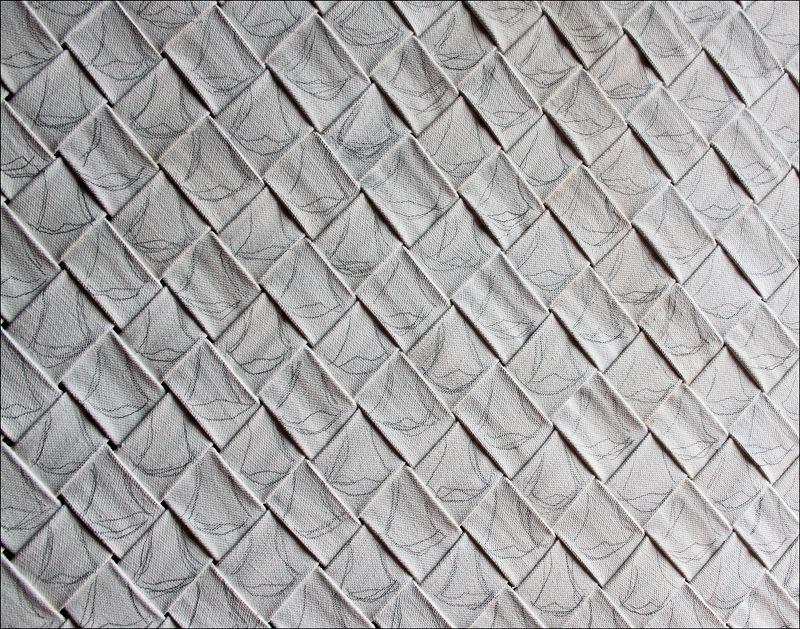
2D Pine Cone
Monday, April 12th, 2010

2D Pine Cone, diagonal 28 x 28 x 1 inches, acrylics on woven canvas strips, wrapped sides painted, signed on the back so as not to intrude on the design.