
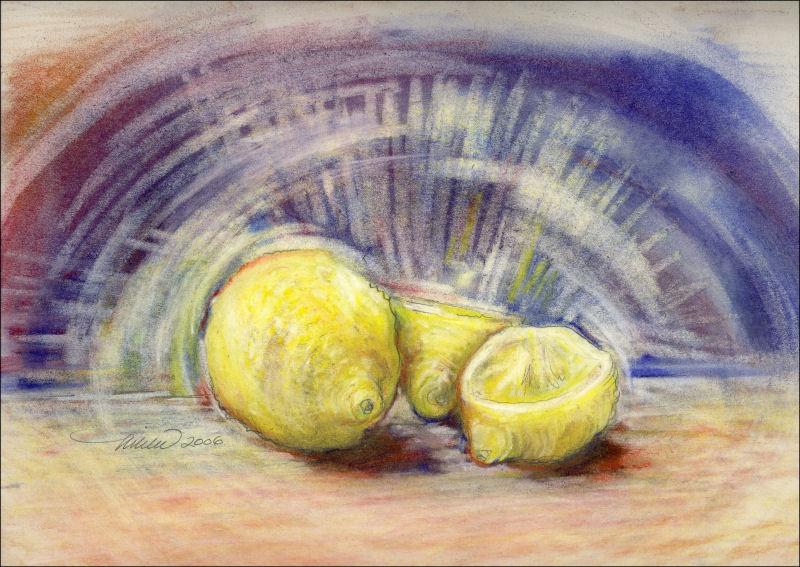
contemporary
Next Entries »Zen Garden #10 almost finished
Wednesday, November 10th, 2010

Zen Garden 10, 40 x 60 x 3 inches mixed media on canvas.
The final stages of this paintings will be finished as it hangs on a wall. As seen in a realistic room setting, it will be easier to spot whatever might make the composition more interesting. Some colors may need to be re-enhanced to add more depth and definition, but I also like the overall faded look, so we’ll see. The texture continues around all 3D edges. This painting is extremely heavy, as it is on a home-built canvas stretcher, so it will be transferred onto a lighter-weight stretcher if it sells. It will still be stable, but practical. All paintings in the Zen Garden series are wired to hang in any of 4 orientations: vertically or horizontally. Below: details of left central portion as seen in the above.

Zen Garden #09 and #10
Tuesday, November 2nd, 2010
Zen Garden 09 work in progress, 48 x 21 x 2 inches mixed media on canvas
The perfect painting in a room can elevate the atmosphere of the whole floor, and sets the tone for showing off the entire house. With selling the house in mind, I’m trying to choose a decent painting for our living room, because Zen Garden 02 sold, so I decided it’s worthwhile to make two more for the series.

Zen Garden 10 outline, 40 x 60 x 3 inches Mixed Media on canvas
Painting is always meditative, but I find it especially so when creating pieces in the Zen Garden series. This kind of work does not present the same kind of emotional concentration or intellectual challenges that other paintings do. There are few struggles and hardly any decisions to make, except to find cooperative materials. Once the outline is accomplished it’s pretty straightforward compared to other forms of painting. The outstanding difference is that each stage in these 3D paintings requires time and patience to allow areas to dry before proceeding. The Zen Gardens can be drying in stages while other work gets done too, and the multi-tasker in me is quite happy to be accomplishing many things at once!
 Art supplies are expensive. Most will last long enough to justify purchases, and much of the time you get what you pay for, but some items are ridiculously overpriced. Keeping material costs down is essential so they aren’t reflected in the final price, but quality should never be compromised. Still, there are ways to get around any dilemma, and there are alternatives for everything.
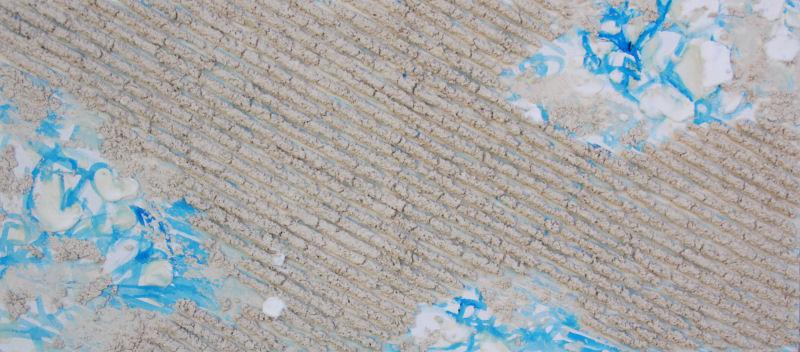
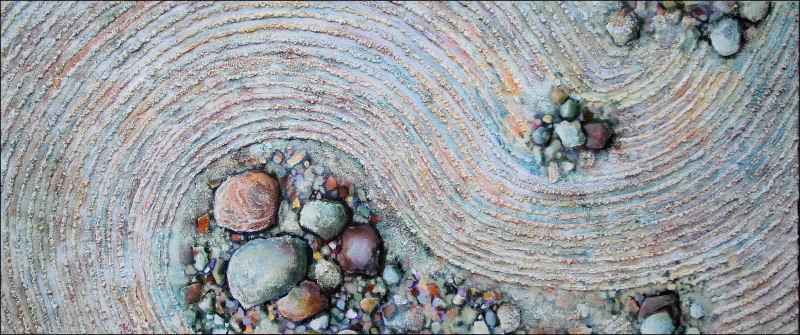
When I started the Zen Garden series ten years ago using modeling paste and textured gels, jars were about $15 for 250 ml. Since then I’ve experimented with various unusual materials, and shopped everywhere to compare prices. It’s still more economical to purchase brand-name products in larger quantities – if you can find them. There are some fun mediums available now too, like gel with tiny glass beads in it. Prices for art supplies do not seem to waver over time in either Canada or the U.S., so I reserve the brand-name mediums to sculpt the rocks and highest quality paints do the finishing touches. Here I’ll share a few of the trade secrets I’ve discovered over the years, and you can create your own Zen garden painting.
 As a base for the raked sand mixture, it’s worth purchasing a large 2 gallon (7.58 L) pail of textured paint. I purchased Behrs at Home Depot in Canada, and it looks like Ralph Loren has the market cornered in the States. Watered-down drywall plaster can be used also, but I recommend attention to how heavy the piece may be when it’s finished. Mix in copious quantities of white glue, large containers of white or light-colored acrylic craft paints, and anything water-based that will extend the liquid mixture and bind well with the dry ingredients. Sand, even popcorn kernals and/or rice can be added for texture. Other objects can be incorporated too…just use your imagination. For example, and this is my most valuable secret, unscented kitty litter from the dollar store, the non-absorbant kind, looks exactly like tiny stones and is light in weight.
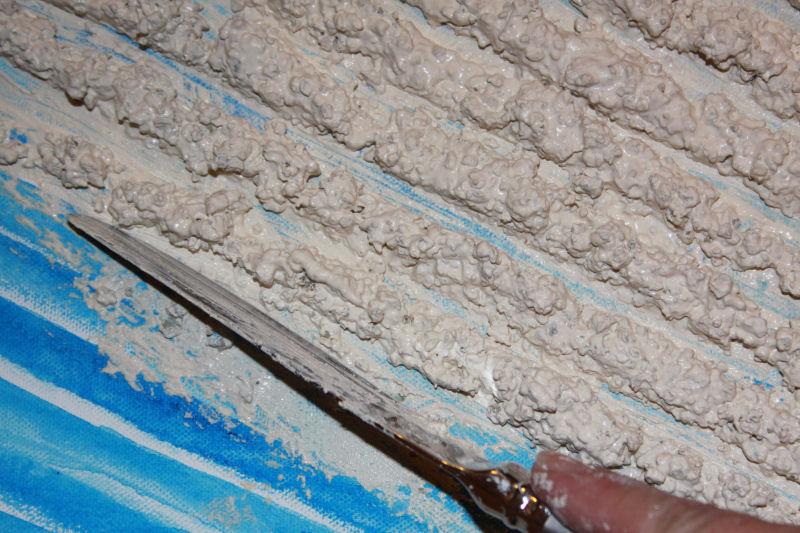
Zen Garden 09 details: applying mixture with a knife, sculpting rows
 The mixture can be put in a ziplock bag with one corner cut out, but I discovered that it’s more efficient – however messy – to spread small portions out onto the surface with a knife and hand-mold it. Keep a wet cloth handy to wipe your hands and the utensil often.
Drywall plaster makes nice-looking rocks, plus it cracks well for a parched-earth look, use sparingly because of added weight. Wood filler is a lighter alternative, much less expensive than professional brand gels and mediums. Modeling pastes do not lend well to sanding or carving when dry, but wood filler can be sanded and re-shaped.  Also, if it dries out completely, chop it up, add water then seal the container for a day or so. This is where you can experiment with whatever helps acheive 3D effects. Art, craft, hardware, department stores and dollar stores carry generic brand basics, so it’s worth researching and shopping around.
When it’s all dry, rocks and other details are outlined and painted with pure colors, then all covered with a coat of primer. The colors are all reapplied to further enhance rocks, then brushed white, skimming across the entire surface. This process is repeated until you are pleased with the results by a final coat of white with remnants of the layers of colors poking through underneath. As far as acrylic paints, you do get what you pay for, but price differences are mostly due to pigment quality and viscosity, which, until final stages is not really an issue. Inexpensive acrylic craft paints are perfect as a filler (only).
 Zen Garden #10, above and left is already quite heavy, so about 1/4 of it will be painted rocks, keeping the sand patterns to a minimum. There is enough mixture that could dry out if it’s not used right away, plus it’s great to make multiples while all the mess, materials and utensils and are out, so I’m doing two simultaneously. There may even be enough for 3!
The necessity of work, especially if it’s at home, seems less like a chore if you dangle some kind of carrot for yourself every day. Sometimes having too much to do is more exhilarating than exhausting. Each day, though work as an artist can be considered by others as play, the energy, motivation and circumstances are unpredictable.. It takes self-discipline to find a way to go with the flow and still get work done. The good thing about this occupation is that it is flexible in every way. The creative compulsion seeps into every other activity, and there is almost no way to not add a little something extra.
What Bigleaf Maples Do At Night
Monday, May 25th, 2009
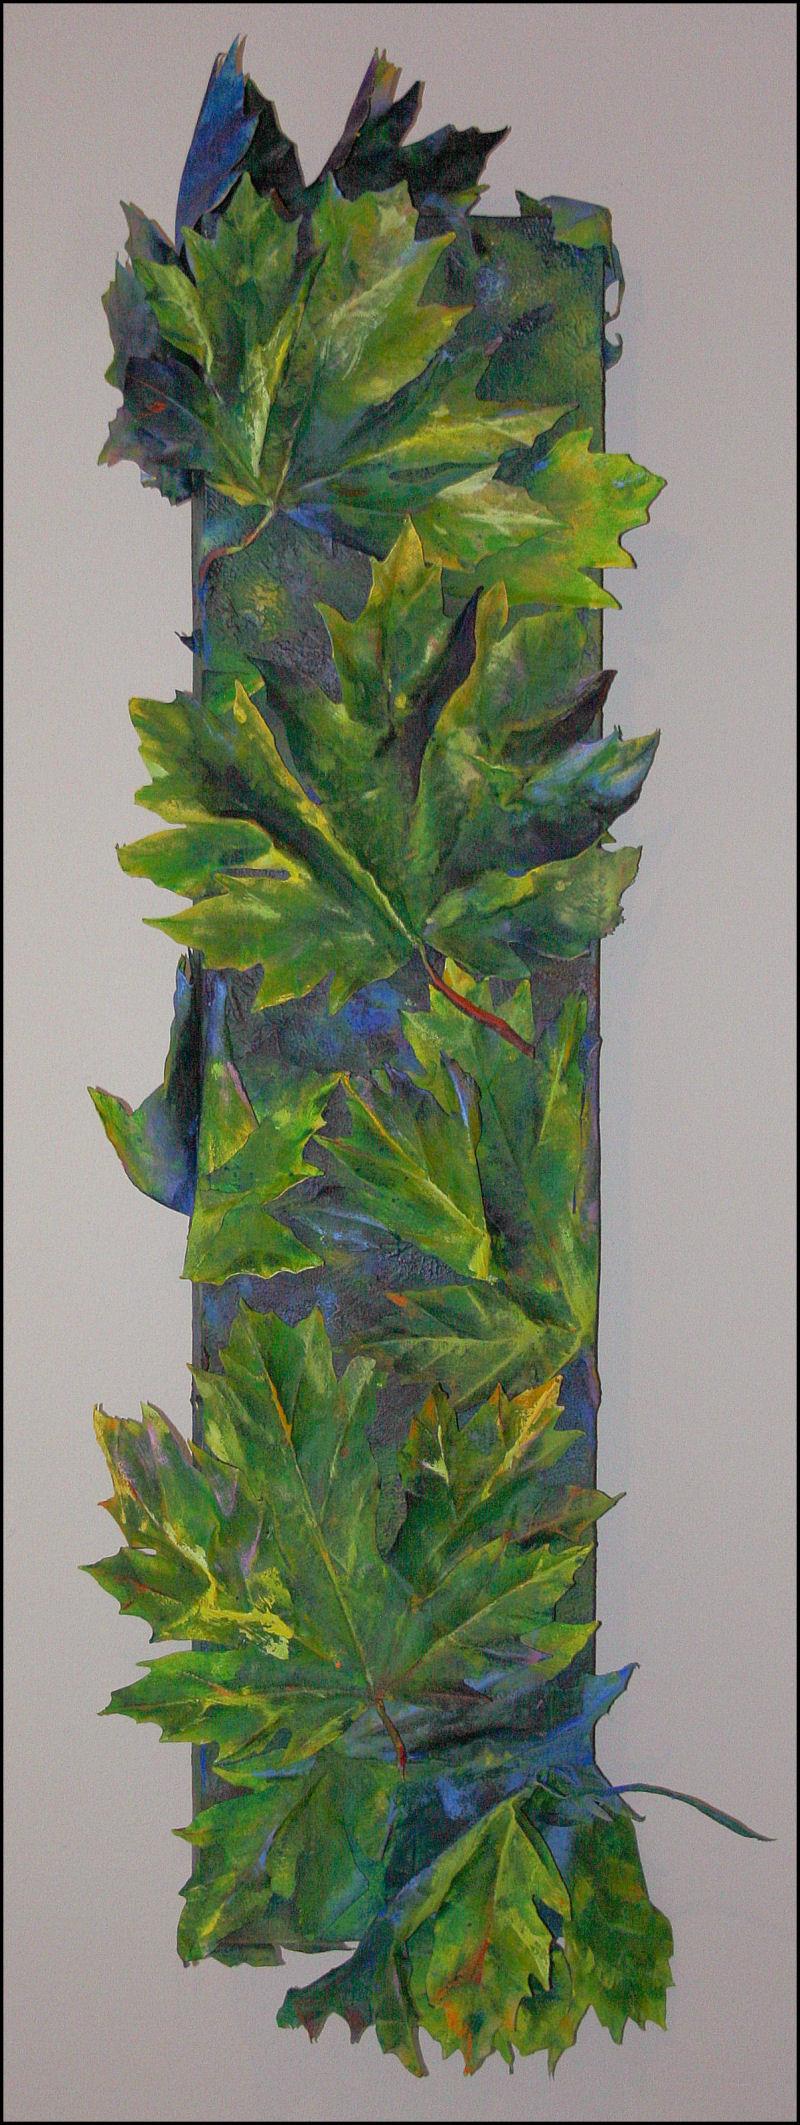
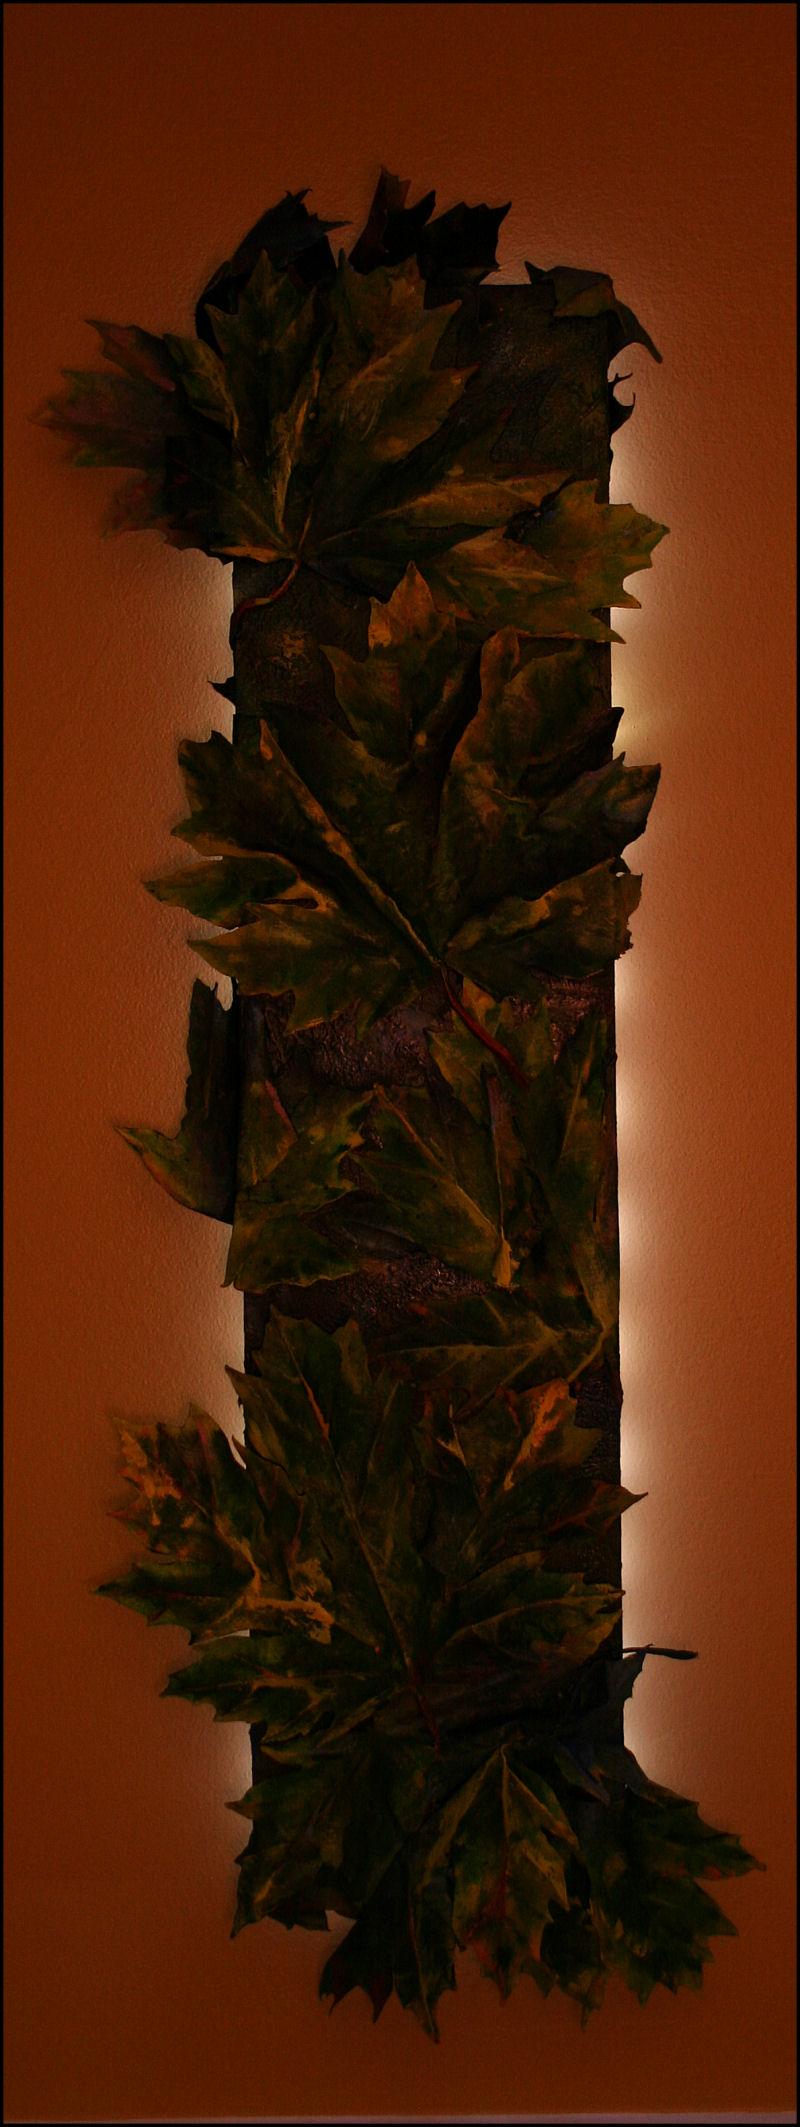
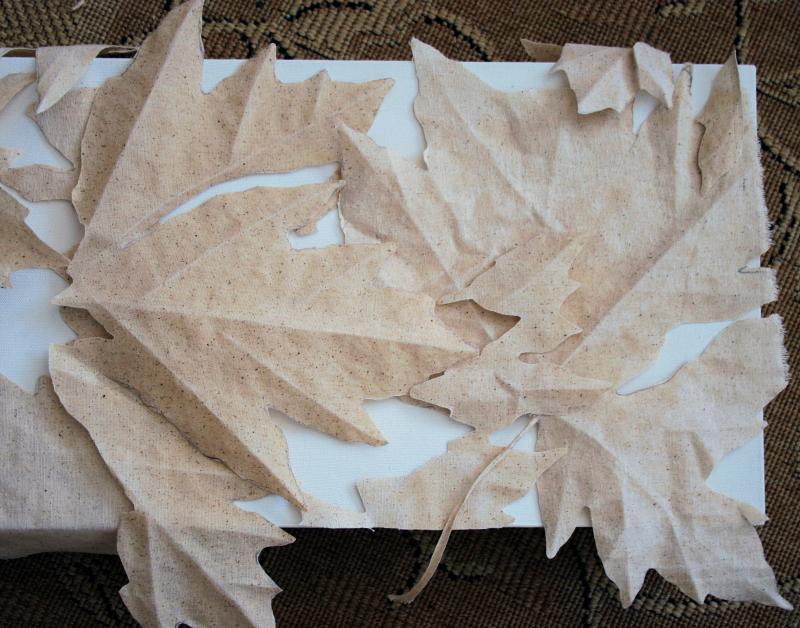
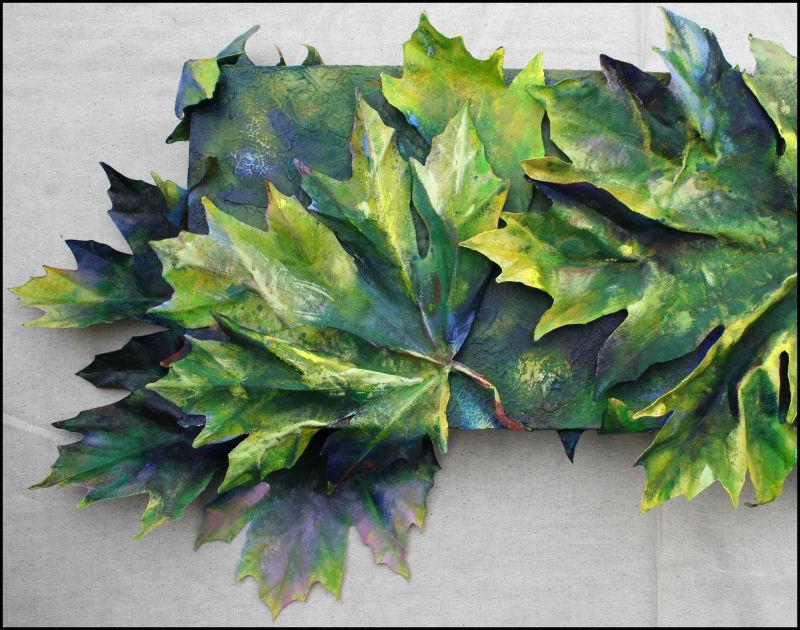
What Bigleaf Maples Do At Night, 57H x 20W x 4D inches muslin, glue, acrylics on canvas wrapped over custom-built stretcher frame. LED light system in back.
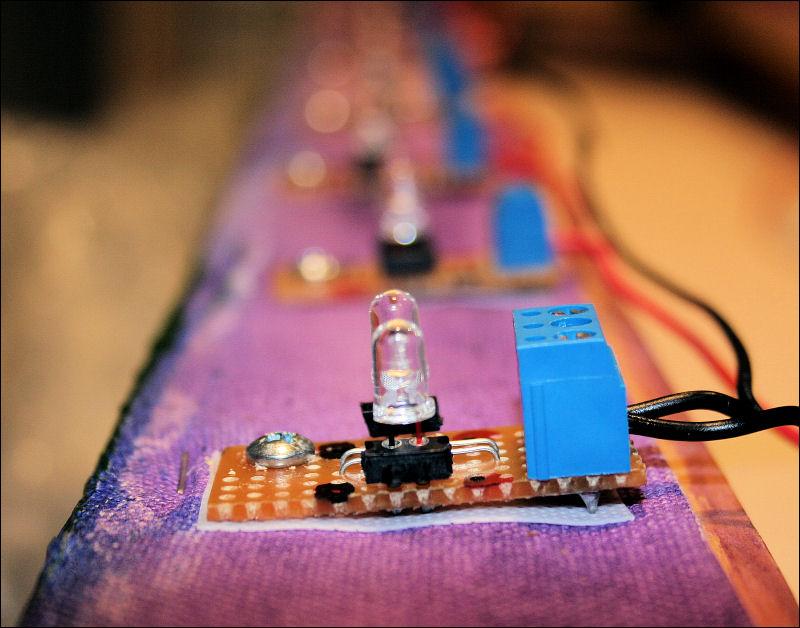
Alain, my husband, signed his name on this also, because he spent the entire week designing, soldering and wiring a system of 30 LED lights for the back. He was not impressed with the eight inadequate push-lights I was initially going to use to create this Day- Night Art. The electric source is a rechargeable 12 volt battery placed neatly in the back, with an easily accessible on-off switch in the lower left corner. He’s not thrilled to ever create another, so it looks like I’ll be learning a little about soldering and electronics, because there are plans to transform the other two canvases exactly the same size as this one. Originally l hoped it could hang in any of four orientations, but that was revised due the battery pack in the back. Thank you Alain for making this piece what it is!
______________________The original blog posts; process:___________________
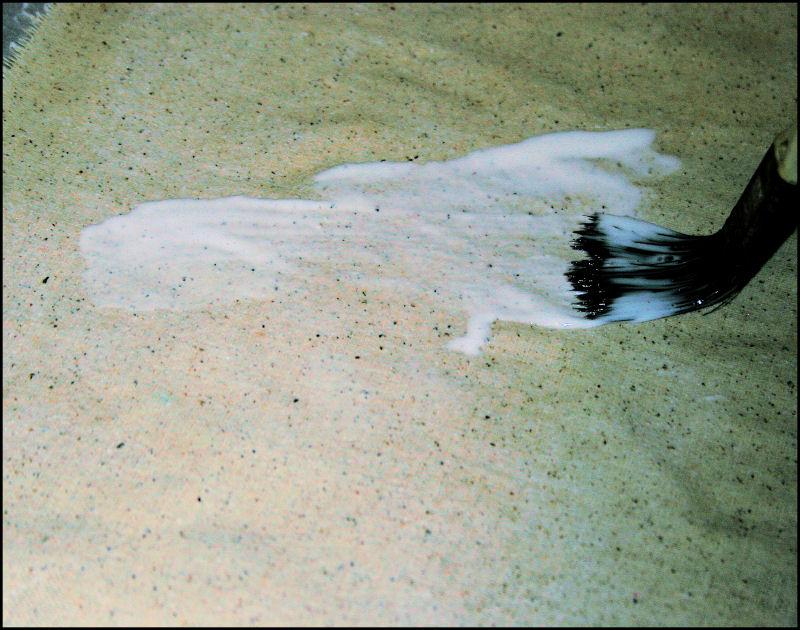
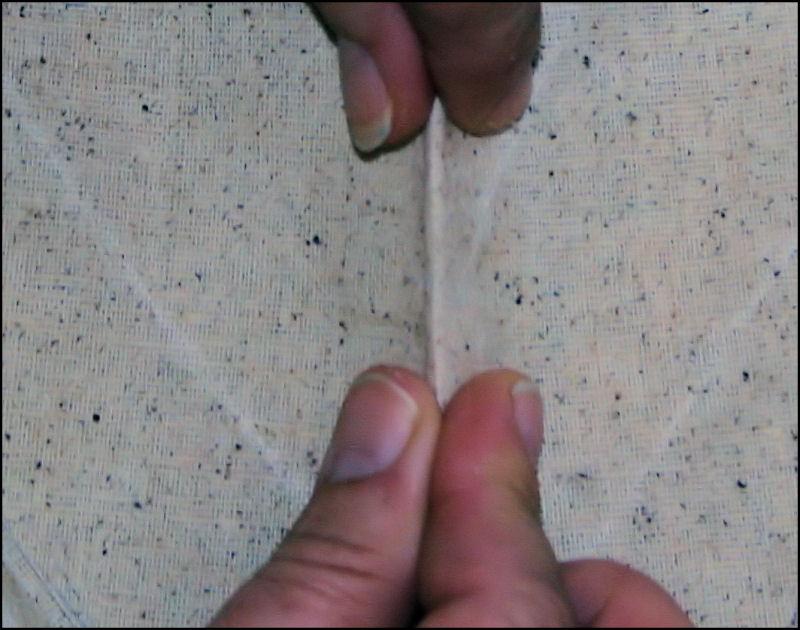
Nov. 17th, 2008: While finishing the final stages of Sun Shower #4, at this point more study than stroke, I’ve started on the next piece… a bit of mystery thrown into this one just for fun. Hint: Step 1 – Unbleached muslin is painted with glue; place over top parchment paper and turn or lift frequently so it doesn’t stick. Nov. 18th: Step 2– When dry the muslin becomes stiff and can be crumpled, pinched and maneuvered to create 3D textures.
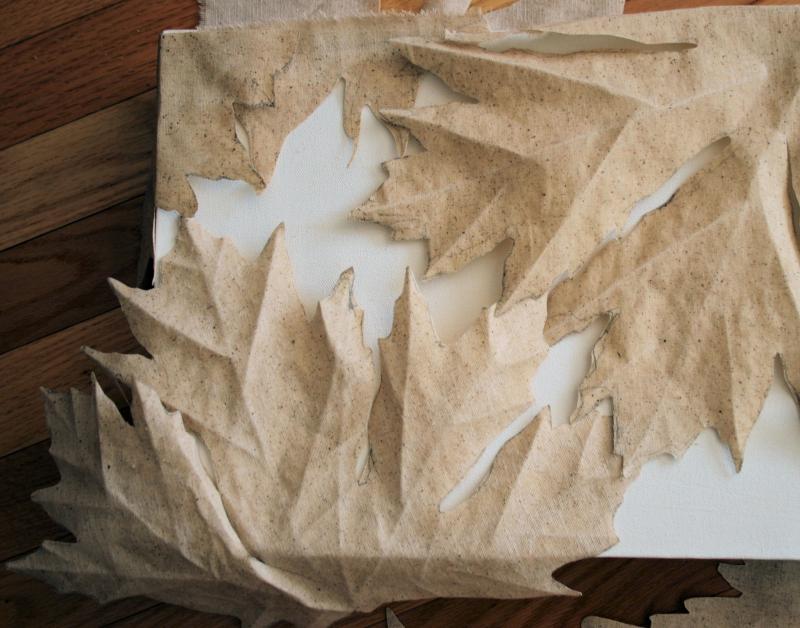
Nov 18th, aft. Step 3 – OK, enough guessing. I have three beautiful sturdy 36 x 12 x 3 inch canvases, hung vertically or horizontally. Each one will have a 3D design of life-sized leaves created with the stiff muslin. This one is of Large Leaf Maples seen on salt Spring Island, B.C. when we were there last summer. They are really this big – about 15 inches across! On these canvases, all dimensional surfaces will be considered; the front, the sides, and possibly some sticking out from the back. Everything will be primed before painting and I love Virginia’s idea to use glue as a resist for the leaf veins. In the above three images the design is still in planning stages.
Nov. 19th – A few thoughts before continuing work: this could be as simple as a sillhouette or painted realistically, still haven’t decided..maybe a compromise of the two, on the abstract side of things. Putting lights in the back could be interesting too, as in the recent Zen Garden #8 but would like to come up with something that does not have a distracting cord.
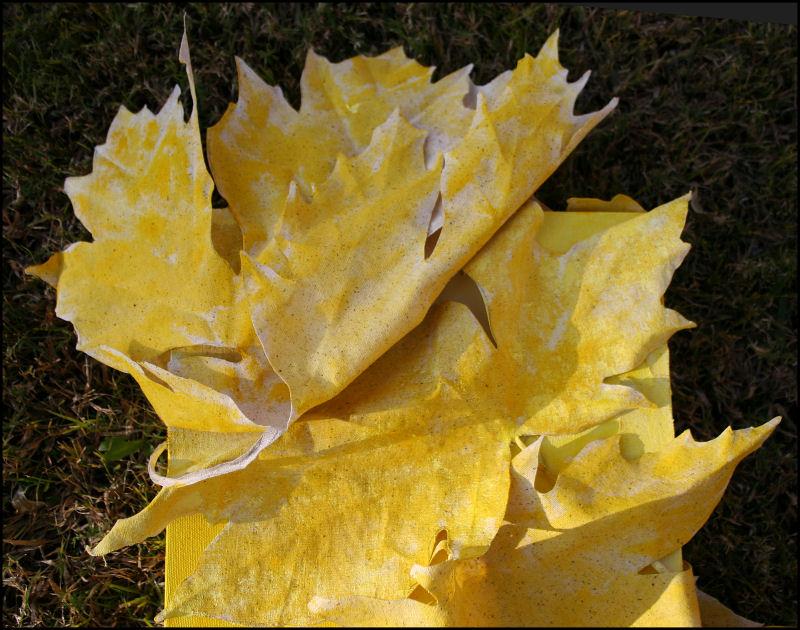 Nov.21st – Seen here, the leaves have a splotchy base coat of Hansa Yellow Deep, a color chosen because when it is so vibrant when it peeks through built up layers of other colors. Now that the entire piece has color though, I think I prefer the sculptural purity of the unpainted sillhouettes better – something to remember for similar work in the future.
The weight of tinted primer and each application of acrylics makes the fabric limp from of the paint, meaning the creasing process needs to be done all over again once it dries, even on successive layers. Because of this I need to slow down and be more gentle with the painting process also. It’s funny how you can overlook things like that when you are ten steps ahead with anticipation for a new project; things always take much longer than you imagine. There is going to be a lot of stopping and starting with this one, which is exactly how overlapping projects occurs.
Also: looking forward to a day-long workshop tomorrow, learning about Encaustic painting with Deanna Wood. Encaustics is an ancient process of painting with beeswax and natural resins. Not usually a “workshop” kind of Artist because I’m too greedy with my work-time, but this is one of those things that’s best learned from an expert. Am bringing a fabric leaf to the class to see how it could be incorporated and if this entire. Large Leaf Maples piece could benefit.
______________________________
All posts and comments for this piece are now combined.
Submitted on 2008/11/18 at 11:48am
If you don’t want to see the seed bits in the muslin, you can get unbleached muslin without the seeds.
_______________________________
Submitted on 2008/11/18 at 1:03pm
OK Lynda, thanks for offering this valuable tip. With regard to what’s in mind for this project, the rawness of the fabric will provide extra texture, but others may want to know that finer quality muslin is available.
Nikki
_______________________________
Submitted on 2008/11/18 at 1:53pm
Hmmm…looks like a resist process to me. Is it a mask? You are a very adventurous soul!
Virginia Wieringa
_______________________________
Submitted on 2008/11/18 at 2:06pm
Nope, not a mask or resist…at least the glue wasn’t initially going to be used as a resist, but once again I owe thanks for the tip via a viewer’s comment – thanks Virginia! It’s true, glue can be used on anything as a paint resist, usually on wood it works similar to crackle glaze (ask me how if anyone is interested). I haven’t tried that technique on raw fabric yet though and for what I have in mind, painting extra glue in strategic places could produce some interesting effects. Let’s see…
Nikki
_______________________________
Submitted on 2008/11/19 at 1:16am
This is great Nikki. I’ll be back tomorrow to see how this project is coming along.
Jim Drury
_______________________________
Submitted on 2008/11/19 at 4:12pm
Hi Nikki
This is getting really interesting, can’t wait to see the finish project
Elizabeth
_______________________________
Submitted on 2008/11/19 at 7:07pm
Thanks for staying tuned Dad and Elizabeth, I also can’t wait to see the finished project – it’s always a mystery even if I think I know what I’m doing.
Nikki
_______________________________
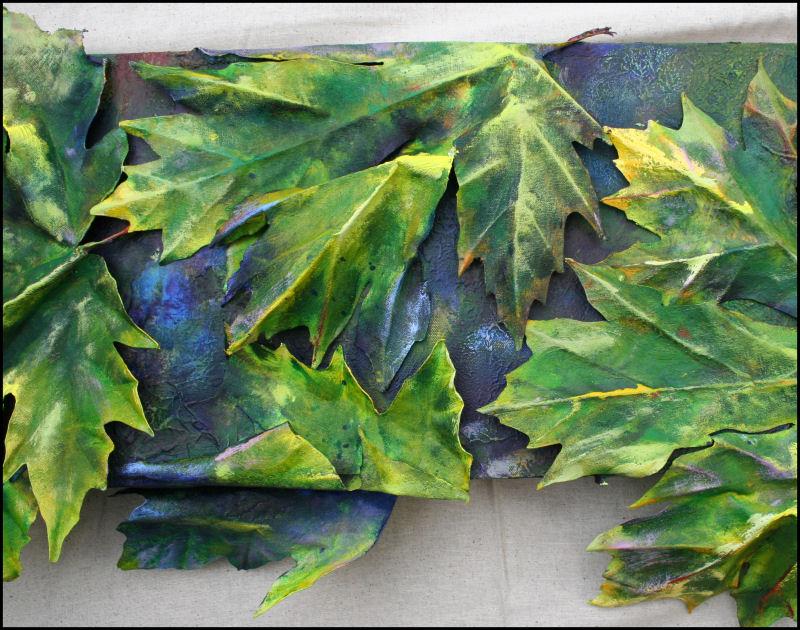
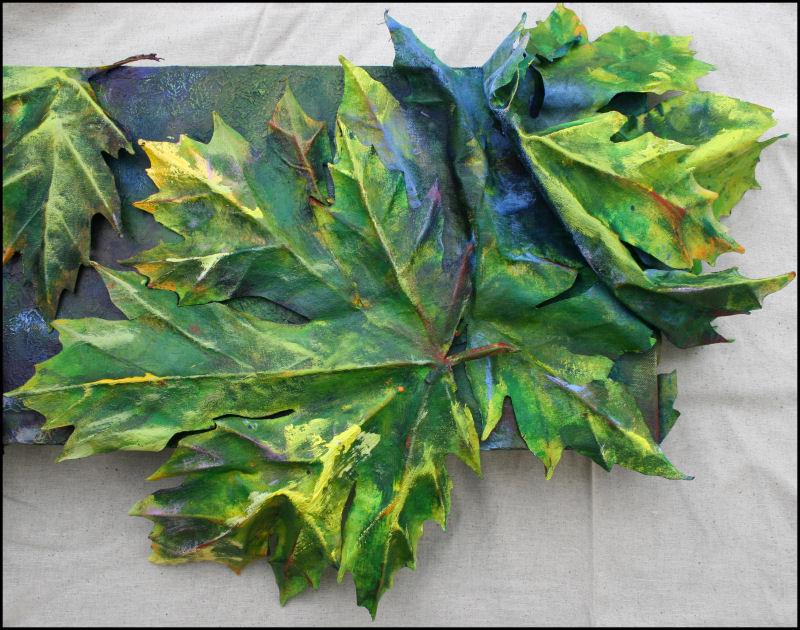
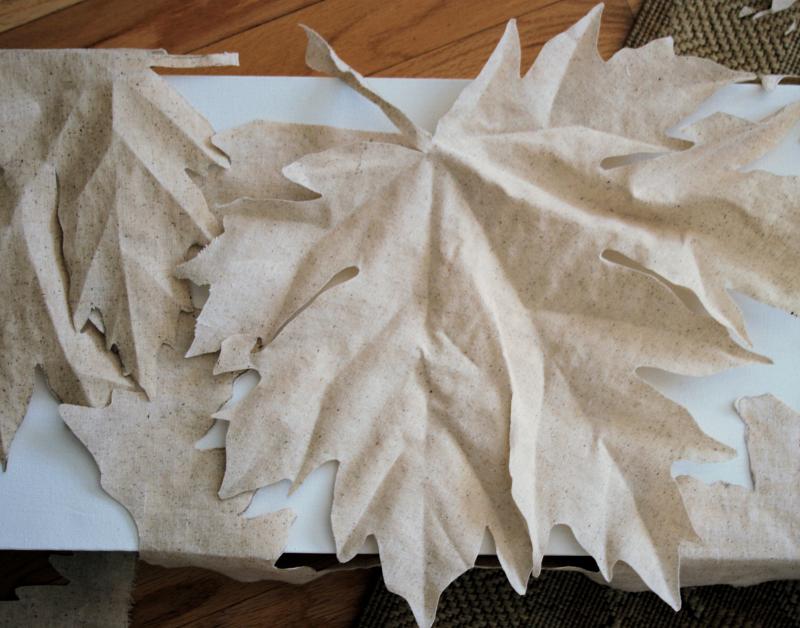
Nov.27: What Large Leaf Maples Do At Night, detail images of 12 x 36 x 3 inches Muslin, glue, acrylics on wrapped canvas. As seen here I imagined the leaves glowing in the moonlight, which took me to the idea of turning it into a piece that can be viewed differently in a dark corner or at night so the sculptural sillhouette shows best.
Since Saturday’s Encaustics workshop I’d like to try another sculptural piece doing the whole thing with 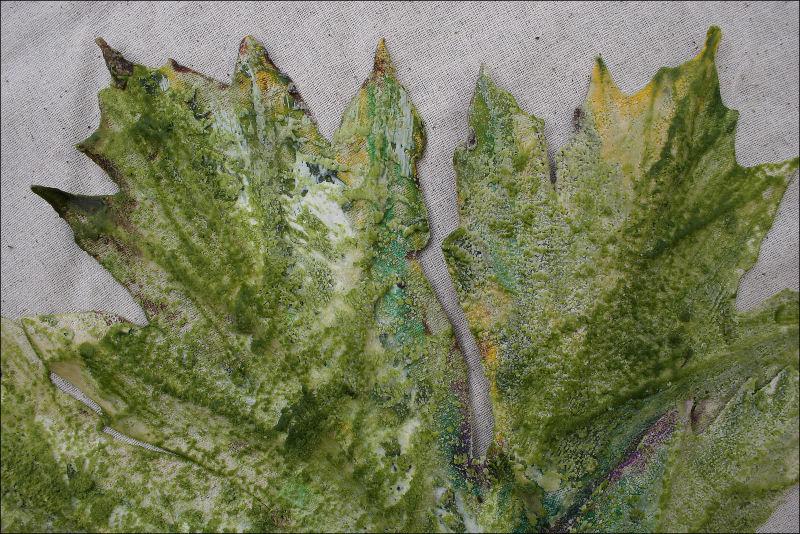 Encaustics tecniques, see right sample. Beeswax doesn’t adhere to acrylics though, so another will need to be planned with that medium in mind right from the start.
Zen Garden 02
Saturday, May 9th, 2009
Zen Garden 02, 48W x 24H x 1D inches mixed media: texture medium, sand, white glue, modeling paste, kitty litter (new of course!), plaster. Wrapped sides painted, frame unnecessary. Sold but can be recreated, not exactly, but in the same spirit as the original.
This painting won the Visual Art Society of Texas title of Artist of the Year (2009) for me at Thursday night’s meeting. This piece hangs vertically, horizontally or can be flipped upside down 2 ways; four different orientation hanging options.
Most of the Zen Garden series are experimental, seeking various ways to obtain the raked sand look without having to pay high prices for the ready-made texture mediums that don’t cover much surface. Zen Garden #2 uses kitty litter bought at the dollar store mixed in varying portions with the above fillers, scooped into a large ziploc bag that was cut in the corner and squeezed out like cake icing onto the canvas. I still had to maneuver the medium into place with fingers because it was so thick coming out of the bag, due to the new absorption factors of new brands of kitty litter. I’ll experiment with aquarium sand and pebbles, or any number of other pet products that are far less expensive than art supplies.
While titles and awards can help refuel encouragement, finding our own source of motivation keeps us working and growing continually, regardless. Robert Genn in The Painter’s Keys has some interesting words about the subject of jurying and acceptance or non-acceptance, quoting Jung, Your vision will become clear only when you look into your heart. Who looks outside, dreams. Who looks inside, awakens.
Approaching Winter
Sunday, December 7th, 2008

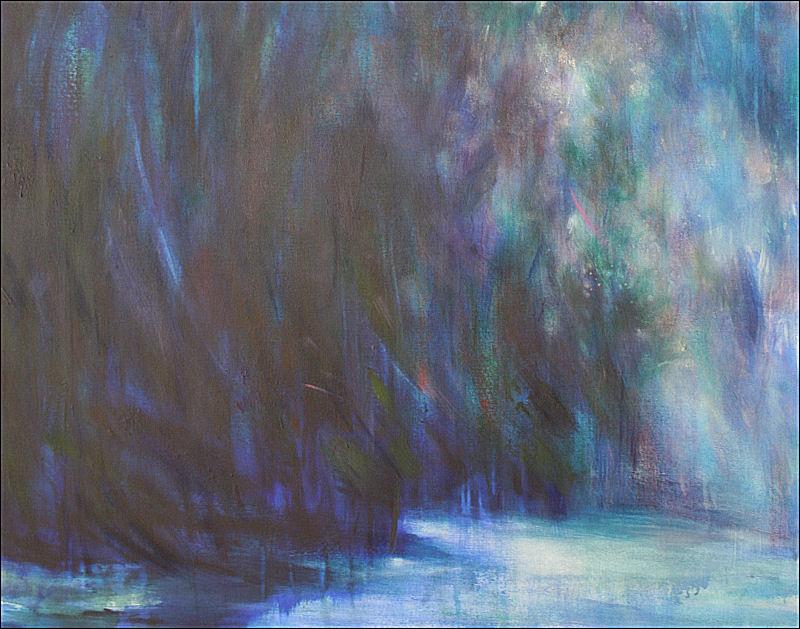
Approaching Winter finished today, 60H x 40W x 3D inches acrylics on canvas. More contemporary than my usual work, thought I’d try a new approach to painting…with more attention to editing rather than overworking. Shown in two detail images above, and full view shown in right thumbnail. Large paintings don’t show as well on computer screen, so there are two detail images that were sharpened 2X to reveal the actual texture as it is close up. Post-dated note: on exhibit at Oxide Gallery in Denton TX until February 28th, 2009.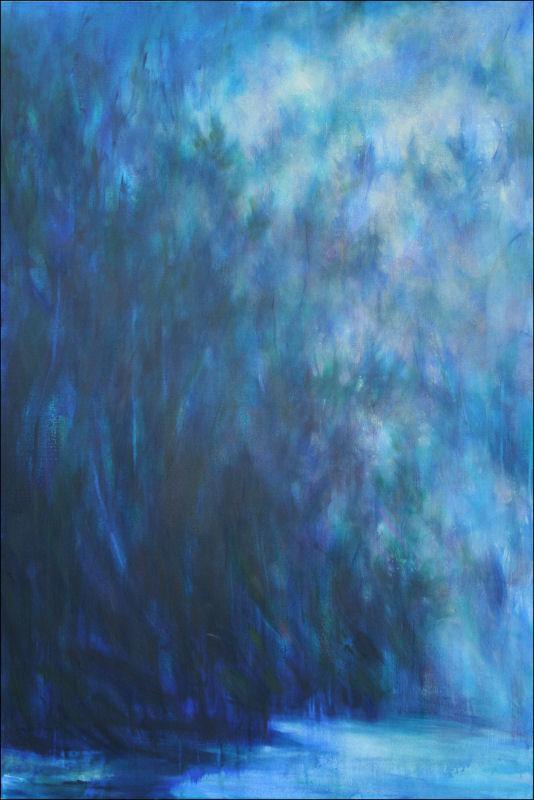
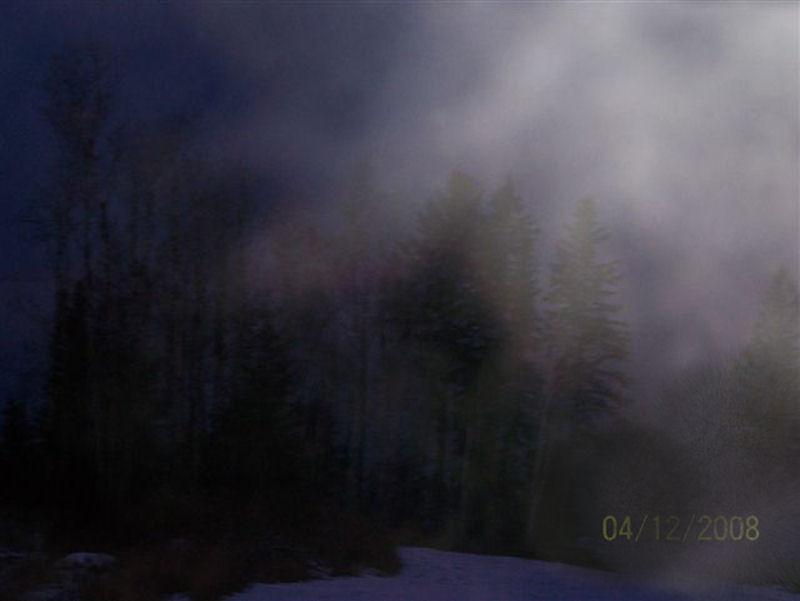
Dec. 6th: Colors mixed with matte medium: Ultramarine, Pthalos Blue, Prussian Blue, Cobalt Blue, Pthalos Green, Sap Green, Unbleached Titatium, Alizarin Crimson and Cadmium Red Deep, Mars Black (rarely use black). This morning I scrubbed and washed away a lot of paint in areas then reapplied more. Trying to stay with the less is more principle. Hope to wrap this one up by the end of the weekend if not before.
Dec. 5th: Stage 1, first coat of Ultramarine Blue and matte medium, very watered down, then applied thick in places. Inspired by photos taken by my good friend Ray Muskego in my home town, Cold Lake, Alberta during sunrise December 4th as misty fog drifted off the lake.
Artini, Shaken Not Stirred
Friday, April 25th, 2008

Artini, Shaken Not Stirred – 24H x 24W inches acrylics on canvas, wrapped sides painted, frame unnecessary, hung diagonally.
Next Entries »